How to Clean a Dog's Ears at Home: A Step-by-Step Guide
- 1. Why Cleaning Your Dog's Ears is Important
- 2. What You Need to Clean Your Dog's Ears
- 3. Step-by-Step Guide to Cleaning Your Dog's Ears
- 4. Common Mistakes to Avoid When Cleaning Your Dog's Ears
- 5. When to Consult a Vet
1. Why Cleaning Your Dog's Ears is Important
Keeping your dog's ears clean is an essential part of pet care. Ear infections are one of the most common health issues dogs face, and improper ear hygiene can lead to discomfort, infections, and even permanent damage. Dogs with floppy ears, such as Cocker Spaniels, or dogs that love to swim, are especially prone to ear problems. Regular ear cleaning helps prevent these issues, ensuring your dog stays healthy and happy.
2. What You Need to Clean Your Dog's Ears
Before you begin cleaning your dog's ears, make sure you have the following supplies:
- Dog ear cleaner (approved by your vet)
- Cotton balls or gauze
- Dog-friendly ear wipes
- Disposable gloves (optional)
- Treats to reward your dog afterward
Choosing the right ear cleaner is important. Avoid using products that are too harsh, as they can irritate your dog's sensitive ear canals. Always opt for a cleaner that is designed for pets and follow the vet’s advice.
3. Step-by-Step Guide to Cleaning Your Dog's Ears
Now that you have everything ready, here’s a step-by-step guide on how to clean your dog's ears:
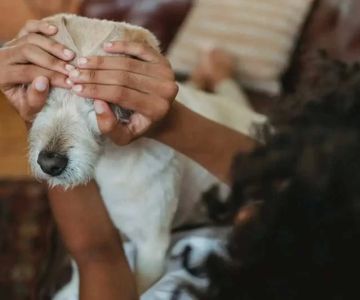
- Step 1: Prepare your dog. Calm your dog and ensure they are relaxed before you begin. It’s important to create a calm environment. Gently hold your dog's head and reassure them.
- Step 2: Apply the ear cleaner. Squeeze a few drops of the ear cleaner into your dog's ear canal. Be gentle and avoid pressing too hard. The solution should be enough to coat the inside of the ear.
- Step 3: Massage the ear. Gently massage the base of the ear for about 20-30 seconds. This helps to loosen any dirt or wax inside.
- Step 4: Wipe away excess debris. Use a cotton ball or gauze to wipe away any excess ear cleaner and debris. Be careful not to insert anything too far into the ear canal.
- Step 5: Repeat on the other ear. Follow the same procedure on the other ear to ensure both ears are clean.
- Step 6: Reward your dog! After cleaning, give your dog a treat and lots of praise to create a positive association with the process.
4. Common Mistakes to Avoid When Cleaning Your Dog's Ears
While cleaning your dog’s ears is straightforward, it’s easy to make mistakes. Here are some common ones to avoid:
- Using cotton swabs: Avoid using Q-tips or cotton swabs as they can push wax deeper into the ear canal, causing more harm than good.
- Not using the right cleaner: Only use ear cleaners that are safe for dogs. Never use alcohol or hydrogen peroxide, as they can irritate the ear canal.
- Not drying the ears properly: Make sure to dry your dog’s ears completely after cleaning to prevent moisture buildup, which can lead to infections.
5. When to Consult a Vet
While cleaning your dog's ears at home is essential, there are times when you should seek professional help. If you notice any of the following signs, consult your vet:
- Excessive itching or discomfort
- Redness, swelling, or foul-smelling discharge
- Excessive scratching or rubbing of ears
These could be signs of an ear infection or another underlying issue that requires veterinary attention.
Regular ear care is an essential part of maintaining your dog’s health. By following the steps above, you can ensure your dog’s ears stay clean and infection-free. For more pet care advice and to schedule a consultation, visit Hidden Brook Veterinary.