How to Clean a Veterinary Refractometer Properly and Safely
- Why-Proper-Cleaning-of-Veterinary-Refractometers-Matters
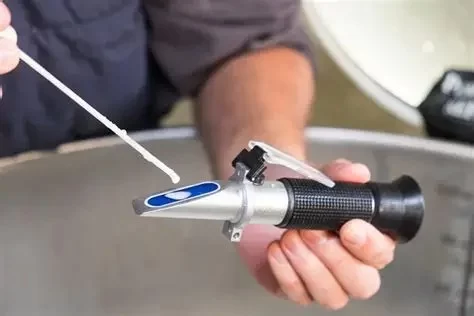
- Step-by-Step-Guide-How-to-Clean-a-Refractometer-Veterinary
- What-Products-Are-Safe-to-Use-on-Refractometers
- Mistakes-to-Avoid-During-Refractometer-Cleaning
- Real-Lab-Story-When-Cleaning-Saved-a-Diagnosis
- Ready-to-Clean-Invest-in-a-Quality-Veterinary-Refractometer
1. Why Proper Cleaning of Veterinary Refractometers Matters
Veterinary professionals rely on refractometers to analyze urine, plasma, or serum for diagnostics. If the lens or prism isn’t clean, even minor residue can skew results. Learning how to clean a refractometer veterinary properly is more than a routine—it’s about ensuring accurate data for real animals.
A well-maintained refractometer increases confidence in diagnoses, supports infection control, and protects your investment. And let’s face it—when a patient’s health is on the line, nothing matters more than precision.

2. Step-by-Step Guide: How to Clean a Refractometer Veterinary
This isn’t just about wiping a lens—each cleaning step protects the integrity of your readings. Follow this routine after every use:
- Turn Off & Secure: Ensure the device is turned off and unplugged if digital.
- Use Distilled Water First: Apply a few drops to the prism and gently wipe using a lint-free lens tissue or soft cloth.
- Disinfect: Follow up with 70% isopropyl alcohol using gentle dabs—avoid over-saturation.
- Dry Gently: Air dry or blot gently with a clean dry lens tissue—never rub hard.
- Inspect: Use built-in light or external illumination to ensure no streaks or smudges remain.
Cleaning a veterinary refractometer properly after each patient minimizes cross-contamination and ensures consistency, especially in high-volume clinics.
3. What Products Are Safe to Use on Refractometers?
When figuring out how to clean a refractometer veterinary, always choose materials that won’t degrade the optics. Safe choices include:
- 70% isopropyl alcohol (avoid higher concentrations as they may damage coatings)
- Distilled water for rinsing away solutes or proteins
- Microfiber lens cloths or optical-grade tissues
Stay away from bleach, ammonia-based cleaners, or rough wipes. If your veterinary refractometer has plastic elements, make sure the alcohol you use is plastic-safe.
4. Mistakes to Avoid During Refractometer Cleaning
Even experienced techs make these errors that shorten a refractometer’s life or affect its accuracy:
- Rubbing instead of dabbing: This can scratch the delicate prism.
- Using tap water: It may leave behind mineral deposits.
- Skipping drying: Residual moisture can cause mold or corrosion.
- Spraying directly: Always dampen a cloth—never spray onto the device.
Good habits go a long way. Just five extra seconds of caution can preserve your tool for years.
5. Real Lab Story: When Cleaning Saved a Diagnosis
Dr. Heather Walsh at an animal clinic in Oregon noticed unusual results while testing feline serum. At first, the readings showed high protein—indicative of inflammation or dehydration. But the tech remembered skipping cleaning the day before.
Upon re-cleaning and retesting, results normalized. That small action prevented a misdiagnosis and unnecessary treatment. It was a teaching moment that proved why understanding how to clean a refractometer veterinary is critical to accurate veterinary care.
6. Ready to Clean? Invest in a Quality Veterinary Refractometer
Whether you're in a mobile clinic or hospital setting, knowing how to clean a refractometer veterinary ensures your results are reliable and your tools stay sharp. But no cleaning method can compensate for subpar equipment. That’s why investing in quality matters.
If you're looking to upgrade or restock with cleaning-compatible refractometers, explore our curated range at Hidden Brook Veterinary. Our equipment is designed for daily vet use, easy to clean, and built for durability.
Clean tools = clean data. And clean data makes for confident, compassionate care.